
Table of Contents
Does every girl specially nail polish lover need a Complete Guide to avoid Nail Polish Mistakes Beginners Make. Have you ever invested time applying nail polish only to notice it chip, smudge, or peel after just a day or two? If so, you are not the only one. Numerous individuals face typical Nail Polish Mistakes Beginners Make, frequently unaware of what went awry.
The great update is that getting salon-quality nails at home is simpler than you realize. Recognizing the typical Nail Polish Mistakes Beginners Make allows you to enhance your skills, safeguard your nails, and attain longer-lasting outcomes.
This manual will address frequently asked questions, provide practical solutions, and assist you in mastering nail care techniques at home.
Why Do Novices Frequently Find Nail Polish Challenging?
Have you ever considered why salon manicures appear perfect while at-home manicures can look untidy?
The solution often resides in planning and skill. Numerous newcomers overlook crucial steps like cleaning the nail surface, using a base coat, or permitting sufficient drying time between layers.
Grasping these fundamental concepts can assist you in sidestepping numerous Nail Polish Mistakes Beginners Make, resulting in a more polished and long-lasting outcome.
Nail Polish Mistakes Beginners Make That Ruin a Manicure:
1. Omitting Proper Nail Preparation
Reasons it occurs: Hurrying, believing polish adheres better to “clean” nails, or being unaware of the proper preparation steps.
Issues that arise: Polish chips prematurely, inconsistent surface, poor bonding.
Repair (step-by-step):
- Eliminate any old polish and oils using acetone or a non-acetone remover.
- Cut and shape with a file (file in one direction).
- Softly push back cuticles — refrain from cutting them unless qualified.
- Gently buff to eliminate shine (only if nails are extremely glossy)
- If your nails are really shiny, buff them lightly to eliminate shine.
- Use alcohol or a nail polish cleanser to clean the nail plate.
- After applying a thin, uniform base coat, allow it to completely dry.
Pro tips: Before polishing, use lint-free wipes and stay away from greasy hand creams. For extended wear, a dehydrator or nail primer is helpful.
2. Putting on Dense Coats
Why it occurs: Thinking one thick layer saves time or attempting to complete quickly. Long drying times, drag marks, bubbles, uneven cure (for gel), and additional chipping are examples of what goes wrong.
Fix:
- Apply thin coats instead of applying one heavy coating, try to apply two or three thin applications.
- Before painting, use a wipe brush to remove any excess.
- In between applications, wait 30 to 90 seconds (or refer to the polish label). Cure every thin layer completely for gel.
Pro Tips: Apply less polish to the brush to gain control; thin coats are shiny and long-lasting.
3. Applying Paint Over Wet Underlayers or Base
Why it occurs: Uncertain drying times or impatience.
What goes wrong: Bubbling, color streaks, and early lifting are examples of what goes wrong.
Fix:
- Before applying the next coat, let each one dry to the touch.
- If you’re in a hurry, apply a quick-dry top coat in between layers of standard polish.
- For gel, always cure each layer for the prescribed amount of time under the lamp.
Pro Tip: You can expedite the process without compromising quality by using a little fan or quick-dry drops.
4. Failing to Close the Free Edge
Why it occurs: Novices neglect to run the brush along the tip of their nails.
What goes wrong: Nails appear worn out quickly, and chips begin near the tip.
Fix:
- To seal the free edge (the tip), gently stroke the brush across it at the conclusion of each coat.
- Apply a final coat that seals the tip.
Pro tips: Apply a little thicker top coat only at the tip (thin elsewhere) for added durability.
5. Overworked Designs (Mess & Smudging)
Why it occurs: While still wet, it is damaged after being adjusted until it is “perfect.”
What goes wrong : Smudges, blobs, and muddled colors are examples of what goes wrong.
Fix:y
- Before beginning, plan the design. Go from the background to the foreground
- Before adding the next component, let each one dry or cure.
- First, try on a practice nail using tools like a small brush and a dotting tool.
- If you make a mistake, remove the polish in that area and start over without dragging or pressing.
Pro tips: While polish is still tacky, have acetone and a tiny brush close at hand to clean borders.
6. Using Inappropriate Tools or Brushes
Why it occurs: Using everyday objects or using the incorrect brush size for detail are the reasons why it occurs.
What goes wrong: Frustration, irregular shapes, and ragged lines.
Fix:
- Purchase a few basic tools, such as a fan/angle brush for gradients, a thin striping brush, a small flat brush, and dotting tools.
- In between colors, clean the brushes with a paper towel and solvent.
- For lines, use a brush with a firm, fine tip; for cleanups, use a little stiffer brush.
Pro tips: A cheap, high-quality striping brush is more valuable than a lot of polishes.
7. Neglecting Nail Health (Lifting, Brittleness)
Why it occurs: Ignore the nail as a live surface in favor of designs.
What goes wrong: thin or brittle nails, fungus risk due to poor cleanliness, and lifting.
Fix:
- Use cuticle oil every day to keep nails moisturized.
- Avoid over buffing or over filing.
- Every few weeks, switch up your natural polish with strengthening treatments.
- When performing tasks, wear gloves to protect yourself from hot water and harmful chemicals.
Pro tips: A basic weekly oil massage that includes cuticle oil and mild pushing enhances the flexibility and look of nails.
8. Selecting Subpar Items (or Expired Polish)
Why it happens: Saving money or failing to check expiration dates are the reasons why it occurs.
What goes wrong: Thickened polish that chips or drags easily, poor pigmentation, and separation.
Fix:
- Use at least mid-range color polishes with positive evaluations and trustworthy base and top coats.
- Replace thickened polish, being careful not to apply too much thinner as this could cause formulae to become unstable.
- Keep polish upright and out of direct sunlight in a cool, dry location.
Pro tips: Before committing to a complete set, test a new polish on one nail.
9. Using too much polish on the brush
Why it occurs: Novices either don’t wipe extra on the bottle rim or dip the brush too deeply.
What goes wrong: Uneven strokes, pooling, and flooded cuticles.
Fix:
- Only 1/3 to 1/2 of the bristle length should be dipped into the brush.
- Use a paper towel or the rim of the bottle to clean any excess.
- Fill the sides with a single, steady stroke each coat after beginning with a thin central stroke.
Pro tips: If polish covers the cuticle, wait until it becomes tacky before cleaning with a wooden stick dipped in remover or with a tiny brush and remover.
10. Not Getting a Good Top Coat or Applying It Wrongly
Why it occurs: Using inexpensive top coatings that peel or turn yellow or believing that color is sufficient.
What goes wrong: Problems include color fading or yellowing, a dull finish, and quicker chipping.
Fix:
- Always use a high-quality top coat to finish. For prolonged wear, apply one thin layer, seal the free edge, and repeat every two to three days.
- For gel, remove the inhibitory layer when necessary and apply the appropriate, compatible top coat.
- Before the top coat cures, clean the edges of any substance applied to the skin.
Pro tip: Use a fast-dry top coat sparingly, it can thin the polish if overused.
What Is the Best Way to Apply Nail Polish at Home?
It is a common question. In actuality, the procedure is rather straightforward:
Clean and shape your nails first. After applying a base coat, let it dry. Next, apply thin layers of nail polish using three strokes per nail—one in the center and one on each side. Before applying the next layer, let the previous one dry.
Apply a final coat for protection and gloss. This technique produces a salon-quality finish and helps eliminate a number of nail polish errors that novices make.
Why Does Nail Polish Chip Quickly?
Ever wonder why, after just a day or two, your nail paint chips? There could be a number of causes.
First, the manicure is weakened if the base or top coat is omitted. Second, heavy coats of polish have a higher chance of peeling. Third, nail polish can be harmed by regular contact with water and cleaning supplies.
Chipping can be avoided by reapplying a top coat every few days and using gloves when doing dishes.
This is one of the most frustrating nail polish mistakes beginners make, but fortunately it is easy to fix.
How to Make Nail Polish Last Longer:
If your manicure lasted a full week or longer, wouldn’t it be fantastic? Here are some useful pointers:
- Before applying, make sure your nails are completely clean.
- Apply a high-quality base coat.
- Put on a few thin coats of polish.
- With every coat, seal the nail’s edges.
- Apply a top coat to finish.
- After painting your nails, do not immediately soak your hands in water.
- Regularly moisturize your cuticles without putting oil straight on recently painted nails.
Your manicure’s longevity can be significantly increased by adopting these easy practices.
How to Dry Nail Polish Faster:
Do you manage to smear your nails before they dry every time? You’re not by yourself.
Apply thin applications of nail paint instead of heavy ones to speed up drying. To speed up the drying process, use quick-dry top coats. After the polish has half set, some people also submerge their fingertips in cold water.
Using a tiny fan to move air around freshly painted nails is another efficient technique.
Another common mistake made by beginners when applying nail polish is to touch surfaces or test your nails too soon.
How to Fix Smudged Nail Polish:
Have you bumped your just painted nails by accident? Don’t panic.
Apply a small bit of nail polish remover on your fingertip and gently smooth the smudge if the polish is still somewhat wet. After the afflicted area has dried, cover it with a thin layer of polish and then apply a top coat.
It’s frequently possible to fix small smudges without completely redoing the manicure.
How to Remove Nail Polish Without Remover:
What happens if you run out of remover for nail polish?
A few household items could be beneficial.
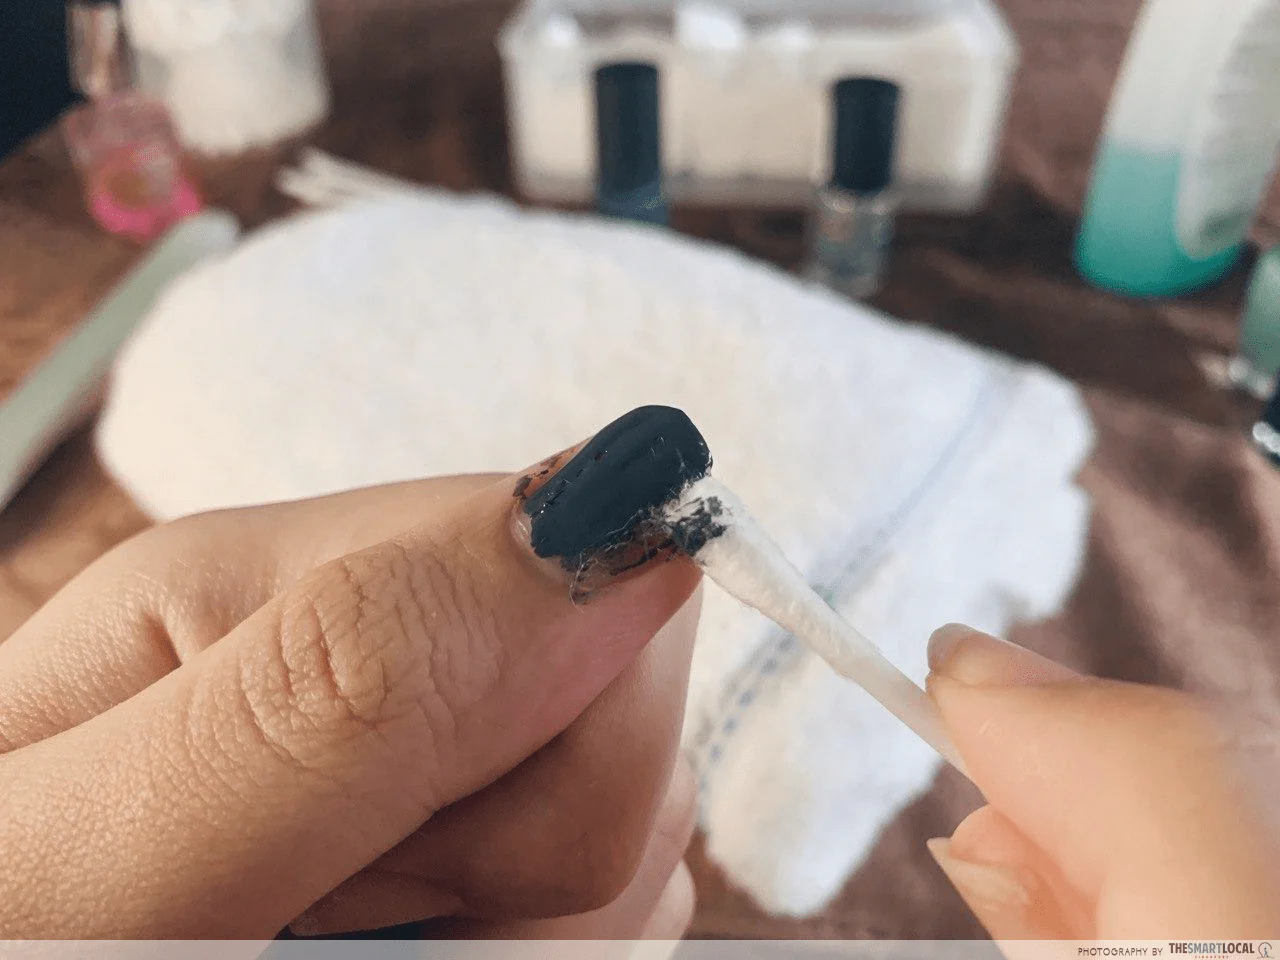
Nail paint can occasionally be dissolved by alcohol-based items as hand sanitizer, rubbing alcohol, or perfume. Gently rub the product onto the nail surface using a cotton swab.
For total removal, you might need to submit several applications. While these substitutes could be useful in an emergency, a good nail paint remover is usually more efficient and kinder to the nails.
How to Remove Glitter Nail Polish Easily:
Have you ever had trouble with glitter polish that wouldn’t go away?
Although glitter polish is stunning, it is infamously challenging to remove.
The foil-wrap method is the simplest. After soaking a cotton pad in nail paint remover, cover the nail and cover the fingertip with aluminum foil. After ten minutes or so, carefully remove the glitter.
This technique minimizes excessive rubbing, which can harm nails, and saves time.
How to Remove Gel Nails at Home Safely:
Is it safe to remove gel nails at home? Yes, but it takes patience.
Lightly file the glossy top layer first. Put cotton pads on each nail after soaking them in acetone. Wait ten to fifteen minutes after wrapping your fingertips with aluminum foil.
After soaking, use a wooden cuticle stick to gently push off the softened gel. The natural nail may be harmed if the gel is forced or peeled off.
One of the most dangerous nail polish mistakes beginners make can be avoided with proper removal.
How to Remove Acrylic Nails Safely:
Is it hard to get rid of acrylic nails? They can be, but when done right, the procedure gets simpler.
First, cut the artificial nails as short as you can. After removing the top layer, soak the nails in acetone for 20 to 30 minutes.
Use a cuticle stick to carefully remove the acrylic as it softens. If needed, keep soaking instead of removing the acrylic.
After removal, properly moisturize your cuticles and nails.
Nail Polish Mistakes Beginners Make and How to Avoid Them:
Let’s summarize some of the biggest nail polish mistakes beginners make:
- Skipping nail preparation.
- Applying thick coats.
- Forgetting the base coat.
- Ignoring the top coat.
- Rushing drying time.
- Using old or expired nail polish.
- Peeling off gel polish.
- Removing acrylics forcefully.
- Exposing fresh polish to water too soon.
- Neglecting nail and cuticle care.
Avoiding these habits can significantly improve your manicure results.
1. How often should I apply a top coat?
Applying a fresh top coat every two to three days helps maintain shine and prevents chipping.
2. Is it possible to get rid of gel nail polish without using acetone?
In general, acetone is the best choice. Alternative approaches are typically less dependable and slower.
3. What causes the bubbles in my nail polish?
When thick coats are applied, polish is vigorously mixed, or nails are exposed to heat during application, bubbles frequently occur.
4. How much time should nail paint take to dry before going to bed?
To minimize the chance of smudging, give yourself at least one to two hours to dry before going to bed.
5. What is the most common nail polish error made by novices?
Applying thick coats of nail paint is one of the most common blunders made by novices. Thin layers stay longer, dry more quickly, and offer superior coverage.
Conclusion:
Professional expertise is not necessary to learn how to take care of your nails. With a few easy changes to your practice, you can fix the majority of nail polish mistakes beginners make.
You may have gorgeous, long-lasting manicures at home by carefully prepping your nails, applying thin coatings, utilizing base and top coats, and using safe removal techniques. Keep in mind that improvement comes from practice. You have the chance to improve your abilities and boost your confidence with every manicure.
Enjoy the process of making gorgeous, healthy nails that express your individual style by taking your time and exercising patience.
Take your time, be patient, and enjoy the process of creating healthy, attractive nails that reflect your personal style.